Sonntag, 1. Dezember 2013

Farmers Wife Quilt - Hovering Birds

Heute bin ich sehr stolz, euch meine erste Gastbloggerin vorstellen zu können: Meine Mama!
Sie hat vor vielen Jahren in unglaublicher Handarbeit mir meinen ersten Quilt genäht.

Today I'm proud to present you my first guest blogger: my Mum!
Many years ago she made my first quilt in incredible work by hand.

Hier ist ihre Anleitung:
Here is her tutorial:

Hovering Birds, Farmers Wife Quilt 51


Das war eine echte Herausforderung für mich. Meine Blocks hatte ich bislang mit der Paper-Piecing-Methode erstellt. Dann dachte ich, es wäre schöner für euch, wenn ich es einmal auf der Maschine probiere – natürlich mit weihnachtlichem Stoff. Mehr als Probieren kam dabei nicht heraus. Es fehlt mir dafür die Ruhe. Für meinen Quilt werde ich diesen Block noch einmal mit der Hand arbeiten.


Zuschneiden
Dort findet ihr eine Druckvorlage.

2 mal Stoff 1 großes Dreieck 3 ½ inch kurze Seite

6 mal Stoff 1 kleines Dreieck 4 inch (doppelte Nahtzugabe)
10 mal Stoff 2 kleines Dreieck 4 inch (doppelte Nahtzugabe)
4 mal Stoff 1 Quadrate je 2 inch

Bei den kleinen Dreiecken doppelte Nahtzugabe.

Zusammennähen:

Der Block wird in 4 Quadraten gearbeitet, dann je 2 zusammenfügen und wieder die beiden Hälften.

Sonntag, 18. August 2013

Inch vs Centimeter

In der deutschen Nähszene (jedenfalls online) wird immer wieder gerne diskutiert, ob man in inch oder cm nähen sollte. Ich perönlich finde die amerikanischen Anleitungen meistens besser, zumindest im Bereich Patchwork gibt es auch viel mehr Auswahl. Allerdings ist die Rechnerei in inch echt ein Krampf, insbesondere, wenn man ausrechnen will, wie viele Streifen in x-inch man aus y-yards Stoff bekommt. Es wäre doch so viel schöner, wenn sich die ganze Welt auf ein Maßsystem einigen könnte (bevorzugt das metrische)!

With german needlewomen (online at least) there is regurlarly a discussion about sewing in inch or in cm. Personally, I prefer the american tutorials and at least with patchwork there is a lot more to choose from. However, doing the calculations in inch gives me the headache, particularly if I want to know how many strips with x-inches width to get out of y-yards of fabric. It would be so much nicer if the whole world could come to terms on one system for measurement (preferential the metric)!

Es gibt einen schönen online-Comic, der sich mit den großen und kleinen Unterschieden rund um die Welt befasst, auch mit den Maßeinheiten, die uns so viel Kopfzerbrechen bereiten.

There is a nice online-comic that focusses on all the big and small differences around the world including the measurements that we have to rack our brains about.


Dienstag, 13. August 2013

Renovieren - Renovating

Ab und zu bekomme ich mal den Drang, etwas zu Hause umzugestalten. Meistens ist das garnichts großartiges, einfach ein Möbelstück etwas anders hinstellen, ein paar neue Accessoires, und fertig. Zu mehr bin ich zu faul habe ich gar keine Lust. Aber ich habe immer großen Spaß daran mir anzuschauen, was andere Leute so machen und Pläne im Kopf zu entwerfen. Einige meiner Inspirationsseiten wollte ich euch heute mal vorstellen.
Every now and then I get the urge to redesign something around the house. Usually that's nothing big, I just place a piece of furniture differently, change some accessory and I'm done. For more I'm usually too lazy I usually don't feel like it. However I always enjoy browsing the internet for things other people have made and making plans in my head. Today I want to show you some of my inspirational pages.

Ein großes Thema bei mir sind Farben. Ich finde es immer sehr hilfreich für jeden Raum ein Farbkonzept im Kopf zu haben, auf das man dann Möbel und Dekoration abstimmen kann. Dafür ist die Seite "design-seeds" super. Zum Beispiel finde ich diese Farben schön für ein Schlafzimmer:
Colours are very important for me. It is really helpfull to have a concept of the colours for each room in your mind when shopping for furnitures or decoration. That's where the page "design-seeds" comes in very handy. For example these colours would look great in a bedroom.


Dann sollte man sich natürlich im Klaren darüber sein, welchen Einrichtungsstil man bevorzugt. Dafür gibt es jede Menge lustige (und auch nicht immer sinnvolle) Quize (was bitteschön ist der Plural???) im Internet. Eines der besseren ist dieses hier. Außerdem erfährt man auf der Seite jede Menge Interessantes zu verschiedenen Design-Epochen. Anscheinend ist mein Stil "amerikanisches Industrial Design" ; )
Obviously you should have made up your mind about what kind of style you prefer. You can find many fun (and not necessarily making sense) quizes (what's the plural?) on the internet. One of the better ones is this one. Moreover you a lot of information about several design eras. Apparently my style is "American Industrial Design" ; )


So, jetzt kommen wir mal zu den ganzen DIY-Seiten, die ich so gerne abstöber. Als erstes ist da für alle Freunde schwedischer Möbelhäuser "ikeahackers".
So, we've finally come to the DIY-pages that I love to browse. First there is "ikeahackers" for all friends of swedish furniture stores.

look at this beautiful sewing room made with IKEA products

Jessica von howaboutorange hat auch immer viele tolle Anregungen für kleinere Bastelarbeiten.
Jessica of howaboutorange also always has many inspirations for small projects. 


Dann gibt es natürlich die ganzen Seiten von bekannten Einrichtungsmagazinen und -sendungen. Es lohnt sich auf jeden Fall mal da vorbei zu schauen.
And then there are all the pages by well-known interior design magazines and TV-shows. It's worth browsing them once in a while.

Und zu guter Letzt können wir Stoffverliebten natürlich auch immer etwas nähen. Einige der Seiten, die ich regelmäßig besuche, findest du in der rechten Leiste.
Last but not least we lovers of fabric are always able to sew something. You can find some of the pages I browse regurlarly on the right side bar.

So, ich hoffe, ich konnte euch ein paar Anregungen geben. Was wird dein nächstes Projekt sein?
Well, I hope I could give you some interesting suggestions. What will be your next project?

Freitag, 9. August 2013

A Skirt - Ein Rock!

Nachdem ich mich mit dem Staples Dress das erste Mal an das Nähen von Klamotten getraut hatte, habe ich Spaß an der Sache gefunden und gleich das nächste Kleidungsstück genäht. Einen einfachen Rock, für den es eine freie Anleitung hier gibt.
Since I had dared to sew a garment (the Staples Dress) for the first time, I found it to be actually quite fun and started the next project. This is a simple skirt, a free tutorial can be found here.

Eigentlich hatte ich erst einen anderen Stoff vorgesehen, aber dann gefielen mir diese Pünktchen so gut, dass ich mich für "Beechwood Park" von Jenean Morrison für Free Spirit entschieden habe.
Originally I wanted to use an other fabric, but then I liked these dots so well that I decided in favour for "Beechwood Park" by Jenean Morrison for Free Spirit.


Der Anleitung konnte man wirklich einfach folgen und der Rock war in zwei Stunden fertig. Geübte Näherinnen bekommen das bestimmt noch schneller hin. Als einzige Änderung habe ich Französische Nähte (heißen die auf deutsch auch so?) gemacht.
The tutorial was really easy to follow and I finished the skirt in two hours. Practiced seamstresses could probably make it even faster. The only adjustement I made was that I used french seams for the side seams.

Montag, 5. August 2013

The Staple Dress

Ich hatte immer einen Heidenrespekt vor den Leuten, die Klamotten nähen können. Ich dachte, dass das nie was für mich wäre, mit meinem "Nicht-Standard-Körper". Was für ein Irrtum!
I always had to take my hat off to people who know how to sew clothes. I thought that that wasn't something I could do, regarding my "non-standard-body". How I was wrong!

Der große Sinneswandel kam mit der ersten Fotos im Netz vom Staple Dress von April Rhodes. Ein lose sitzendes Kleid, dass nur in der Mitte etwas zusammengerafft wird, und das vor allem keine Abnäher hat. Das sollte doch zu schaffen sein!
I changed my mind the moment I saw the first photos of April Rhodes' Staple Dress pop up on the Internet. A loose fitting dress, shirred in the middle, and most important: without darts. That should be manageable!

Als Stoff wählte ich ein Muster aus der "Indie" Kollektion von Pat Bravo für Art Gallery. Ich hatte schon  Fotos von diesem Kleid mit anderen Stoffen aus der Kollektion gesehen und konnte mir so ziemlich sicher sein, dass der Stoff schön fallen würde.
For the fabric I chose a design from the "Indie"-collection by Pat Bravo for Art Gallery. I had seen photos of this dress made with other fabrics from this collection and hence could be quite sure, that it would have a nice drape.

Das Kleid an sich war wirklich einfach zu nähen, nur der Saum hat etwas Geduld erfordert.
The dress was really easy to sew, the hemline required some patience however.


Sonntag, 14. Juli 2013

Landmädel QAL - Block 3: Churn Dash

Ich hatte ja schonmal Andeutungen gemacht, dass ich jetzt bei einem Farmer's Wife QAL mitmache. Da wir aber alle aus dem deutschsprachigen Raum sind heißen wir "Landmädel QAL".
As I have hinted before, I'm now a member of a Farmer's Wife QAL. Since we're all German speaking we changed the name to "Lanmädel QAL".
Das ist meine Stoffauswahl/ My fabric choice
Hier sind meine ersten beiden Blöcke:
Der erste Block: Calico Puzzle: Ich werde wohl den orangenen Stoff austausche, der ist zu intesiv/ The first block: Calico Puzzle: I will probably substitute the orange fabric for something less intensive.

Der zweite Block: Whirlpool/ The second block: Whirlpool.
Diese Woche bin ich damit dran, einen Block vorzustellen. Ich habe mich für "Churn Dash" entschieden, weil er gute Möglichkeiten zum "Abkürzen" bietet.
This week it's my turn to introduce a block. I chose "Churn Dash", because it offers several possibilities for "shortcuts".
Der fertige Block/ the finished block
Dazu muss man die Stoffe wie folgt zuschneiden (Wichtig! In dem Foto unten habe ich die großen Quadrate erst zu groß geschnitten):
For that purpose you have to cut the fabric as follows (Important! In the photo below I cut the large squares too big):

  • heller Stoff/ bright fabric:
    • 1 Quadrat 2,5"x2,5"/ 1 square 2.5"x2.5"
    • 1 Quadrat 4"x4"/ 1 square 4"x4"
    • 1 Rechteck 1,5"x10" (erst etwas länger lassen)/ 1 rectangle 1.5"x10" (leave it slightly longer at first)
  • einfarbiger Stoff/ solid:
    •  1 Rechteck 1,5"x10" (erst etwas länger lassen)/ 1 rectangle 1.5"x10" (leave it slightly longer at first) 
  • dunkler Stoff gemustert/ dark patterned fabric:
    • 1 Quadrat 4"x4"/ 1 square 4"x4"
 Half square triangles
  • Nimm die beiden großen Stoffquadrate und lege sie rechts auf rechts aufeinander. Take the large squares and place them right sides together.
  • Nähe eine 1/4" Naht einmal komplett (!) außen herum. Sew a 1/4" seam completely (!) around the square.
  • Markiere die Diagonalen und zerscheide das Quadrat in vier gleiche Dreiecke. Mark diagonally across the square and cut it into four equal triangles.
  • Aufbügeln und die Maße kontrollieren. Iron open and check the measurements


Die mittleren Seitenteile/ the middle side parts:
  • Nähe die beiden Stoffstreifen entlang der langen Seite mit einer 1/4" Naht zusammen. Sew the two fabic strips together along the long side, using a 1/4" seam.
  • Aufbügeln. Iron open.
  • Schneide vier 2,5" Stücke von dem Stoffstreifen ab. Cut four 2.5" pieces from the fabric strip.
Zusammen setzen/ putting together
Lege nun alle deine Stoffteile gemäß der Vorlage aus und nähe sie zusammen, indem du zunächst Reihen nähst.
Lay out your fabric pieces according to the pattern and sew it together, sewing first rows.

Ich freue mich auf eure Blöcke!
I'm looking forward to see your blocks!

Montag, 24. Juni 2013

Stempel machen mit Kindern - making stamps with children

Letztens habe ich euch ja schon einmal von meinen ersten Experimenten mit Stempeln berichtet. Hier kommt jetzt die versprochene Anleitung, um Stempel mit Kindern zu basteln.

Recently I wrote in this blog about my first experiments with making stamps. Here's now the promised tutorial on making stamps with kids.
I took this crappy photo with my mobile phone, but you should get the idea.

Materialliste / required materials:
  • starker Karton (notfalls zwei Lagen zusammen kleben) strong cardboard (glue two layers together if yours is too flimsy)
  • Moosgummi (Reste) foam craft sheets (leftovers)
  • Flüssigkleber liquid glue
  • scharfe Schere (evtl. auch Cutter und Schneidematte) sharp scissors (possibly cutter and cutting mat)
  • Stempelkissen ink pad 
Zunächst sollte man sich Gedanken über den Zweck und damit die Grundform des Stempels machen. Möchte man damit einfach nur lustige Muster auf's Papier/ den Stoff bringen, dann ist die Grundform egal. Möchte man allerdings Flächen mit dem Muster erstellen, so muss die Grundform gut überlegt sein. Damit das Gestempelte nahtlos aneinander passt, braucht man als Grundform eine Form, die sich für Parkettierungen eignet. Wer keine Lust hat, sich darüber den Kopf zu zerbrechen, kann erstmal mit Rechtecken und Quadraten starten. Vorlagen für andere Parkettierungen kann man z.B. hier finden.
First of all you should give some thought to the purpose and thus the basic shape of the stamp. If you simply want to get fun decorations onto paper/ fabric - go ahead, the basic shape does not matter. However, if you want to cover an area with your design, you have to give the basic shape some thought. To archive an evenly covered area without gaps, you need a basic shape that works for tessellations. For an easy solution start with squares and rectangles. Templates for other tessallations can be found here.

Wenn man sich für eine Grundform entschieden hat, schneidet man sie sich aus einem dicken Stück Pappe aus. Dafür braucht man evtl. ein Cuttermesser mit Unterlage (also nix für Kinder). Wenn man mit Pappe arbeitet, sollten die Stempel nicht länger als 5cm werden, damit sie sich noch gut drücken lassen. Für professionellere Stempel kann man Akrylplatten nehmen. Dann kann man daran gehen, sich das eigentliche Motiv für den Stempel auszudenken. Dafür einfach die Grundform mehrmals auf Papier übertragen und losskizzieren. Insbesondere für Kinder (und ungeduldige Menschen) sollten die Motive nicht zu kleinteilig und schmal sein.
When you have decided on a basic shape, cut it out of strong cardboard. You might need a cutter with mat for that purpose (kids shouldn't do this). Stamps made out of cardboard should not be longer than 2", so that you can press them properly. For a more professional aproach you can use acrylic plates. Afterwards you can start to actually design the motive of the stamp. Copy the basic shape several times on paper and start sketching. Expecially for kids (and other impassioned persons) the motives should not be too small and flimsy.

So, jetzt ist schon das Meiste geschafft. Man muss jetzt nur noch das Motiv auf Moosgummi übertragen, ausschneiden und mit Flüssigkleber (wieder nix für kleine Kinder) auf die Grundform des Stempels kleben. Ein kleiner Rest Pappe oder Papier macht noch einen Griff und dann kann's losgehen!
So, we're nearly there. Copy the motive onto foam craft sheet, cut it out and fix it with liquid glue (not for small kids) on the basic shape. Use some paper or cardboard leftovers to make a handle. 

Hier seht ihr mal einige der Muster, die meine Schüler erstellt haben. Nicht alle haben das mit der Parkettierung richtig hinbekommen, sieht aber trotzdem gut aus.
Here you can see some of the patterns created by my students. Not all of them got the tessellations right, but they look good nonetheless.
 

Dienstag, 18. Juni 2013

WIP - trip around the sea

Erinnert ihr euch an die blauen Stoffstapel mit Meeresmotiven, die ich letztens geposted habe? Die (und einige Stoffreste) werden jetzt peu à peu zu einem "Trip around the Sea" Quilt verarbeitet. Das ist eine schöne Arbeit ohne viel Nachdenken, genau das, was ich beim ganzen Abistress gebrauchen kann.
Do you remember the blue fabrics with ocean motives that I posted earlier? Those (and some scraps) will be little by little made into s "Trip around the Sea" quilt. That's nice and relaxing work, perfect for these stressful days with final exams at school.

Sonntag, 16. Juni 2013

Sommer - Summer

Das Wetter ist diese Jahr merkwürdig: Erst gab es einen sehr langen und kalten Winter mit Frost im Mai, jetzt habe wir schon fast tropische Temperaturen. Während der Süden und Osten Deutschlands untergeht, musste ich hier schon viel im Garten gießen. Dafür blüht es jetzt schön.
Weather is strange this year: First we had a very cold and enduring winter with frost in may, now we are close to tropical  temperatures. While the south and east of Germany is literaly drowning, I already had to water my garden. It's blooming nicely at least.

Samstag, 15. Juni 2013

Stempel - Stamps

Immer wenn ich Stoffe kaufe, gefallen mir die Stoffe am besten, die handgestempelt sind oder zumindest so wirken. Also habe ich mir ein Buch gekauft, um etwas über die benötigten Techniken zu lernen.
Whenever I go shopping for fabric online I feel drawn towards fabrics that are hand printed or at least have a handprinted feeling to them. That's why I bought myself a book to learn about the required techniques.

Zuerst habe ich mich an Techniken versucht, die kein besonderes Material benötigen. Lustigerweise war den Tag mein Bruder zu Besuch, der schon selbst T-Shirts mit Siebdruck bedruckt hat. Zu zweit macht sowas einfach mehr Spaß!
I decided to start with techniques that don't require a lot of special equipment. Funnily enough my brother, who had done some T-Shirt printing himself was visiting that day. Doing such things together is a lot more fun!

Eine Technik, die wir ausprobiert haben, war die Arbeit mit freezer paper. Dieses Papier kann man auf Stoff aufbügeln und später wieder abziehen. Die Tinte füllt die Leerstellen im Papier wie bei einer Schablone. Deshalb eignet sich dieses Verfahren eher für kleine Motive. Leider konnte man durch die ganze Tinte das Papier nicht mehrmals verwenden, sonst hätte man das Bügeleisen versaut.
One of the techniques we gave a try was working with freezer paper. This paper can be ironed on  fabric and easily peeled of later. The ink fills the empty places in the paper just as with a template. This is why this method works best with small motives. Unfortunately the ink messed up the paper. That's why I did not try to iron it on a second time.
The teacattle worked well, the duck was too large and made a real mess.

Besonders viel Spaß hat mir das Basteln von Stempeln gemacht. Dafür haben wir einfach die Motive in rechteckige Radiergummis aus dem 1€-Laden mit einem Skalpell geschnitzt. Motive mit langen, fließenden Kurven waren einfacher zu schnitzen, als kleinteilige Motive. Diese Stempel liegen sehr gut in der Hand, man kann sie immer wieder verwenden und sie brauchen auch nicht viel Tinte.
I especially enjoyed making stamps. My brother and I simply carved the designs into cheap erasers from the Dollar-Store with a scalpel. Designs with long and smooth curves were easier to make than designs consisting of many small parts. These stamps are comfortable to hold, you can use them over and over again and they don't need much ink.
The lily of the valley was easier to carve and made a better stamp than the other one.

Inspiriert von diesen schönen Ergebnissen entschloss ich mich, auch mal mit meinen Schülern Stempel zu basteln. In der Klasse 6 werden in Geometrie Muster, Parkettierungen und Drehungen durchgenommen. Ein super Thema für Stempel! Falls ihr das mal nachmachen wollt, hier ist eine Materialliste:
Inspired by these beautiful results I decided to make stamps with my pupils. Geometry in year 6 is about tessellation, patterns and rotations; perfect for stamps! If you want to give it a try, here is a list of the materials needed:
  • starker Karton (notfalls zwei Lagen zusammen kleben) strong cardboard (glue two layers together if yours is too flimsy)
  • Moosgummi (Reste) foam craft sheets (leftovers)
  • Flüssigkleber liquid glue
  • scharfe Schere (evtl. auch Cutter und Schneidematte) sharp scissors (possibly cutter and cutting mat)
  • Stempelkissen ink pad 
 
Die Anleitung veröffentliche ich die Tage, wenn ich ein wenig mehr Zeit habe.
I will post the tutorial soon when I have more time.

Donnerstag, 13. Juni 2013

Follow my blog with Bloglovin

Ich bin jetzt auch bei bloglovin und ihr könnt mir dort folgen.
You can follow me now with bloglovin.

Sonntag, 9. Juni 2013

Swap°pen auf deutsch

Normalerweise schreibe ich hier ja nur auf englisch, aber ich habe eine neue nette Gruppe auf flickr gefunden, die in Deutschland beheimatet ist. Es ist schön zu sehen, dass auch in Deutschland modern genäht wird. Deshalb werde ich mich in Zukunft hier zweisprachig versuchen.
I usually write this blog in English, but I found a new group on flickr that's based in Germany. It's nice to see modern sewing in Germany. That's why I will try to write in both languages here in the future.

Die oben angesprochene Gruppe heißt Swap°pen auf deutsch. Sie funktioniert nach dem Wichtelprinzip, d.h. dass man von jemandem etwas genäht bekommt und selbst etwas für jemanden aus der Gruppe näht. Es bleibt aber bis zum Ende geheim, wer für wen näht. Ein großer Spaß! Dieses Mal war das Thema Beutel/ Taschen.
The group mentioned above is called Swap°pen auf deutsch. A swap works like this: Someone in the group will sew something for you while you sew something for someone else in the group. Up until the end it's a secret who sews for whom. Great fun! This time the theme was to sew a tote.

Ich war mir zunächst ziemlich unsicher, weil die anderen Näherinnen in der Gruppe schon meistens sehr erfahren waren. Außerdem hatte meine Partnerin Farben ausgewählt, von denen ich keine große Auswahl in meinem Vorrat hatte. Zum Glück ist sie von rot/ orange/ gelb auf blau/ grün / grau umgeschwenkt ;)
In the beginning I felt unsure how well I would fit into this group because there were many experienced sewers. Moreover my partner had picked colours that were not represented well in my stash. Lucky for me, she swapped from red/ orange/ yellow to blue/ green/ grey.

Als Schnittmuster habe ich Elizabeth Hartmans "perfect quilted tote" gewählt. Es ist ein super erklärtes Schnittmuster mit vielen Bildern. Ich würde nur nächstes Mal den Vlies etwas zu klein ausschneiden, weil er durch das viele Quilten eh plattgedrückt wird und sonst in die Nahtzugaben reindrückt.
I chose Elizabeth Hartman's "perfect quilted tote". The tutorial is very well written with many pictures. Next time however, I would cut the batting slightly too small, because all the quilting flattens the batting and pushes it into the seem allowances.

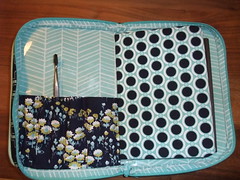
So, und hier ist jetzt die Tasche, die ich für die liebe Erika genäht habe: (bitte entschuldigt die schlechten Fotos, ich kriege es nie richtig hin, Fotos drinnen richtig zu belichten)
So, here finally is the tote I sewed for dear Erika: (please excuse the poor quality of the photos. I never get the light right with indoor photos).

So, jetzt wollt ihr bestimmt auch sehen, welche Tasche ich bekommen habe? Es ist die perfekt Tasche für mich! Miriam hat einfach total meinen Geschmack getroffen. Inzwischen habe ich die Tasche schon gut in Gebrauch und sie ist wirklich praktisch und schön!
So, I guess you want to see the tote I recieved as well? I have to tell you that's the perfect bag for me! Miriam hit my taste completely. Meanwhile I've put the tote to good use and it's really practical and beautiful!
Durch die Swap°pen Gruppe habe ich viele neue Leute kennengelernt und es gibt eine Fortsetzung! Ein Teil von uns wird einen Farmer's Wife Quilt Along starten. Ich freue mich schon sehr darauf! Insbesondere freue ich mich, dass ich meine Mutter überreden konnte, auch mitzumachen.
I got to know many nice people through Swap°pen auf deutsch and there will be a sequel. Some of us will start a farmer's wife quilt along. I'm really looking forward to this project, particularly because I could coax my mum into taking part as well.
 

Dienstag, 16. April 2013

Baby Quilt

I finished my first commissioned quilt! Good friends of my sister became parents and she wanted to give them a baby quilt.
For this I took some gorgeous birch fabric and improv pieced around it. This was my first try at improv piecing and I have to say that although I love the result, the process was quite tedious and stretched my patience.
front

back

back close up

front close up

ready to give away

Sonntag, 14. April 2013

Stash Note #2

In between Christmas and Easter I didn't find much time to sew. With this much work however,  I desperately needed to relax procrastinate every now and then. So no sewing but procrastinating - how does this fit together? -> project planning and fabric shopping.
I probably have enough projects in line by now to keep me busy for a whole sabbatical (not that I'm having one) ;).
So here we go: I show you all the projects I'm planning and you can point with your finger on me by the end of the year for not finishing half of them *g*.
First is an update on stash note #1. I bought more of this beautiful fabric by Pat Bravo and some oakshott "sand" as solid. These will make a starburst quilt for me.
Second are some sea related blue fabrics. On the left is Tula Pink's "Salt Water" and on the right Deb Strain's "Seascapes". These fabrics have quite different hues of blue/ aqua but I'm planning for a scrappy quilt ("trip around the world"), so diversity is an advantage. My stash also contains a lot of blues/ aquas that go with these fabrics. This quilt is supposed to be for my uncle, who loves blue and the sea.
 Third are some really beautiful fabrics in white/ black/ grey: "architextures" by Caroly Friedlander fo Robert Kaufman and "faux bois" by Patty Sloniger for Michael Miller. I don't have a particular project in mind for these, maybe some paper piecing. (I got them here)
These amazing fabrics are the Lipari line by oakshott fabrics. They're shott cottons with one direction in black so they have this dark shine and look different from every angle. This makes them the perfect fabrics for a "male" quilt (for Tino). The only problem I'm having with these is the combination with other fabrics. Bright solids would work without doubt but I want to keep it very male - meaning greyish dark. I bought some other fabrics (!) here that might go with them. I have to give them much more procrastinating thought:

Dienstag, 2. April 2013

overdue updates

Is it really that long ago that I wrote my last blogpost? Time flies...
I have been busy nonetheless, I just forgot to write about the projects (and to take photos in some cases).
So here we go:
First the projects I finished for Christmas:

A bowtie quilt for my grandparents. My gandma expecially likes how the backing goes with their carpet which summarizes quite well how the orange does not work with the rest. A lesson learned...
I made a weighed pincussion organizer with this tutorial for my mum.

A few days before Christmas I finally finished the top for the sew.quilt.give bee. Jenn was so nice to make it into a quilt and even made a second babyquilt with the spare blocks.
I did not take any photos and accidently deleted her mail with hers, so no photos now.

In February was my grandpa's birthday. To my grandma's regret he is a lover and collector of stamps. I made him a sheath to transport stamps. It looks like a pencil case and I worked along some tutorials on the net. In the end it was quite hard to make because I used a lot of heavy interfacing to make it sturdy and to protect the stamps.
Uh, and there are so many projects in the making and in planning that there will be more news coming!